Proper Filament Extrusion
Before we talk about different adhesion techniques, we need to make sure the filament extrusion is correct as well. We want to be able to create some adhesion by pressing the filament against the platform, but not so much it ruins the bottom of the print. To show the different results, look at the diagram below.
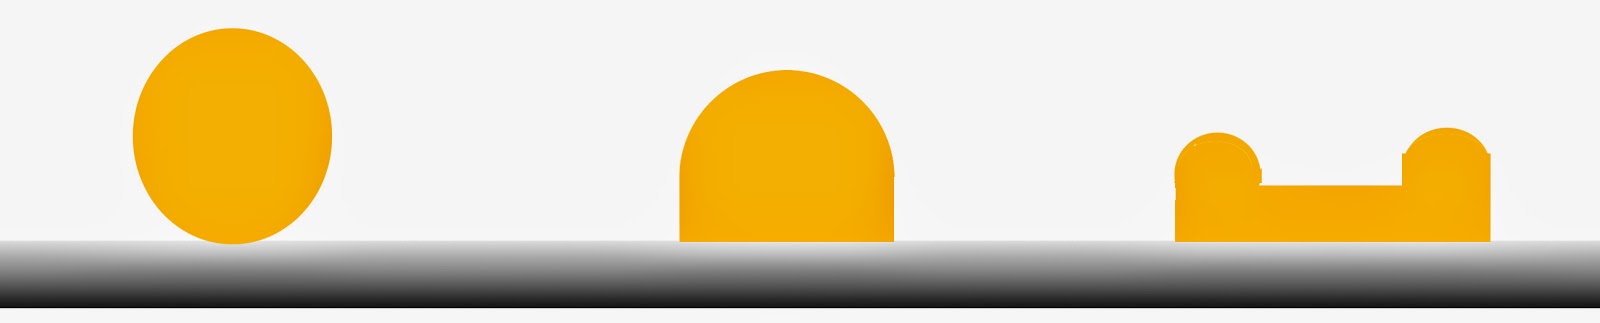
This diagram shows the filament as it sits on the bed after being extruded. On the left, the filament isn't really pressed against the platform, and just sits on top of the platform. When you do this, your first layer may seem stringy, and even move around as the print continues. Basically, the extruder isn't really printing on a platform, more than thin air, because it is just being laid onto the platform.
The second example shows a filament being extruded where the offset has been reduced, pushing the filament against the platform, and allowing it to conform to the platform. This is the result you want to achieve. This result gives the first layer the adhesion it needs, as well as keeping the print's form correct.
On the third example, the offset of the extruder is lowered to an extreme, causing the filament to be smashed against the platform, and raise back up around the extruder. This happened to me a lot, because a lot of answers to poor adhesion was that the filament was not close enough to the bed. If you find yourself getting the same answer, ignore it; this is not your answer, and will make your print even worse. When doing this, your print will stick to the platform quite well, but the layers after the first will be offset from the added height from the sides, and throw the model completely off.
Lastly, I want to mention, if you see more than one of these patterns at different sections of your platform, you rather have an bed that is not level, or an axis that is not even. You should have the same type of extrusion over the entire platform before printing. If you do not, please contact your manufacturer. If it is a Printrbot, you can also ask here, and I will help as much as possible.
Other Steps to Take For Great Adhesion (Non-Heated Platforms)
If you are using a non-heated platform, your manufacturer may suggest that you use Blue Painters Tape for adhesion for the platform, as well as protecting the bed (platform). Unfortunately, no one really explains why it's better. When I first started, I used what was handy, and that was yellow masking tape. It did work well, but the blue painter tape worked even better. The reason being, is that the blue tape is less coarse, allowing a smoother surface for the filament to conform to.
 While the tape is a great addition to the platform, it is not enough to keep prints from raising up, or warping. It is at this time that adding a chemical finishes the preparation of the platform. For any platform, I recommend, as well as many others, Aqua Net. Yes, the hair spray. To be specific, the purple bottle, All Weather Super Hold. Before you even heat up your extruder, spray some of this on the blue tape where you will be printing, spread it around the platform so to get it all over the tape, and let it dry before printing. For the best results, I would suggest doing the preparation after each print, so that it sits until you print again (You will be replacing the tape each time most likely).
To give you an idea of the amount of adhesion you should receive, the print should take the tape with it, and even then be somewhat difficult to remove. Having that amount of adhesion keeps corners from lifting, and provide a beautiful solid print.
Great Adhesion (Heated Platforms)
Now it's time to talk about heated platforms. Like the non-heated platforms, that purple bottle above comes in handy. First off, if you are using PLA, you want to keep the heatbed at 60C at all times, and for ABS 100C. No more, and no less. At one time, I was lucky to receive a few good prints when overheating the bed in the first layer, but ended up causing more warping in the long run.
Also similar to the non-heated platforms, you want to use tape on your platform, not only to help hold a print, but to also help the print stick to the platform. The one to use for heated platforms is Kapton tape, a temperature resistant film with silicone adhesive. This is great for any heated platform, as it can withstand temperatures up to 260C. If you are using a glass platform with a Z axis probe, it will not detect the tape, and go right through your glass platform when homing the Z axis. Copper tape is one solution, but not a very cost effective one.
With the Kapton tape, spray some Aqua Net on the platform before heating it up, and let it sit. After 15 minutes or so, you can starting heating everything up, and then print.
Even Better Adhesion (Heated Platforms with ABS)
One of the benefits to using a heated platform is being able to print with Acrylonitrile Butadiene Styrene, also know as ABS. One of the biggest reasons is for it's structural strength. This is the same material Lego uses for it's pieces, so count how many times you have stepped on a Lego, and broke it. Exactly, this material is tough!
One other advantage of ABS is the the ability to react to acetone very well when dealing with 3D printing. Instead of using Aqua Net, you can use a little 100% pure acetone on the platform while it's hot to help your print stick to the bed. Just like Aqua Net, you are applying this to a bed with Kapton tape already added. This is simply an addition to make sure your prints stick as best as possible.
When using acetone, be careful of the vapors, and when removing from the platform will require the print to be cooled off, as well as the heatbed. You may find yourself using a putty knife to remove it from the platform even when cooled. This is the type of adhesion you want to accomplish.
Extreme Adhesion (Heated Platforms with ABS)
Last but not least, if you want your print to stick, and forget what warping even looks like, this solution will prove to be the best. Another great benefit to ABS, is that it can be reused. Surely you've been saving all of those support scraps, and warped prints, right? If you have, you can make ABS Slurry, also known as ABS glue. This is great stuff to glue parts together as well, hence the name.
 To make your slurry, put a few ounces of ABS scraps in a glass jar, or metal container (like an empty paint can). Next, pour two cups of 100% pure acetone into the container, and watch the ABS literally melt away. Using a bristled brush, stir it around, so that all of the pieces dissolve. Once you have done this, you should have a saturated looking liquid, with a bit of color from the filament that has dissolved.
With the slurry made, heat up your heatbed that already has Kapton tape on it, and then use the brush to apply slurry onto the platform. You will see the acetone turn to vapor, and the remaining ABS conform to the platform. When you print on top of this, your first layer will print over the thin layer of ABS slurry, making it act as part of the platform itself. Make sure that the room is well ventilated, or the acetone vapors can cause issues for anyone in the room.
After the print is done, you will need to wait for the platform to cool, before you attempt to remove it. Other makers have modified their printers to have easily removable platforms, so that the print as well as the platform could be put in a freezer right after printing. Apparently the print will almost fall off when doing this.
So that's it! I hope this has helped someone in their pursuit towards quality 3D printing, and saved you time and confusion. Now print something awesome, and don't worry about your print sticking, because you have this under control now.
No comments:
Post a Comment